

First apply your base color and let it dry completely. Or you can do this tutorial on an older mani, like I'm doing. On the picture I'm wearing OPI Suzi Says Feng Shui that I applied the day before. As you can see there's a tiny bit of tipwear, but we're going to cover that up in a bit!

Now cut off a little piece of tape off the roll, and then cut the piece in smaller strips lengthwise. You can make wide strips, or thin ones, parallel or divergent ones, just cut a bunch of different sizes to create a playful design.
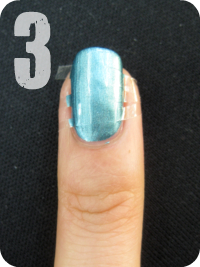
If you're done cutting, place the strips one by one on across the nail. You can leave space between strips to create continuous stripes, or let them overlap slightly at one side of your nail to create triangles. To solve tipwear of your old mani like I do, leave the tip uncovered like in the picture. In step 3, a new coat of polish wil cover it up, making your mani look brand new again. You can also apply this trick to cover up VNL (visible nail line).
If you're done cutting, place the strips one by one on across the nail. You can leave space between strips to create continuous stripes, or let them overlap slightly at one side of your nail to create triangles. To solve tipwear of your old mani like I do, leave the tip uncovered like in the picture. In step 3, a new coat of polish wil cover it up, making your mani look brand new again. You can also apply this trick to cover up VNL (visible nail line).
Make sure the tape has fully adhered on the nail (it tends to lift up around the edges of the nail). Then apply your layering polish and remove the tape strips right away. And by that I really mean right away! Because if you let the layering polish dry up too much, it's going to stick to the tape and when you remove the tape it can drag some polish with it and ruin the design a bit. So my advise is to do the painting and removing of the strips on one nail at a time.
If you're using this design to cover up tipwear, I'd recommend to use an opaque layering polish, otherwise your tipwear will still be visible.
If you're using this design to cover up tipwear, I'd recommend to use an opaque layering polish, otherwise your tipwear will still be visible.

Finally apply some topcoat, clean up, et voilà!
Polishes I used in this post are OPI Suzi Says Feng Shui and China Glaze Adore
 26 comments


Lovely combination! I like it a lot!
ReplyDeleteI love these mummy tape manicures you do, they look extremely flattering on you :)
ReplyDeleteI just did a taping with my first matte color. I think I might pick up a matte topcoat to play with my other polish. Good tip about putting on a normal topcoat first!
ReplyDeleteThanks for the amazing tutorial! I often try manicures like this one, but I always mess it up :P From now on I will follow your advices :)
ReplyDeleteVery pretty nails (: I don't know what I do wrong, but I've failed my tape manis every single time I've tried to do them. Maybe I should try once again :D
ReplyDeleteThanks for the tutorial, very good! :)
ReplyDeleteGreat tips and tutorial! I'll have to try this manicure soon, I really like it! Thank you.
ReplyDeleteSuper leuk :) Ik heb 'm uitgeprobeerd, en naar je tutorial en je site gelinkt in m'n laatste post. Keep up the good work!
ReplyDeletei would be interested to see how it looks with the crackle by china glaze as that topcoat! i think i'm going to try it! :D
ReplyDeletethanks sooooooooooooooooooooooooooooooooooooo much for making this tutorial I have been trying to figure out how to do this for AGES! As always keep up the fantastic work <3
ReplyDeleteThanks for a great tutorial! Just what I needed :)
ReplyDeleteHi Jamie, heb een eerste poging gedaan.
ReplyDeleteOmdat je hiernaar benieuwd bent en we links mochten plaatsen, voila: http://www.beautygoddess.nl/nailz/my-first-mummy-mani.html
Ben benieuwd wat je ervan vindt en misschien nog tips hebt ;-) !
Je heet Jane ipv Jamie... snap niet waarom ik dacht dat je Jamie heette! Sorry, zal nog wel niet helemaal wakker zijn ;-)
ReplyDeleteWow this is amazing! Definitely trying this! xx
ReplyDeleteI did it :D http://www.dottiek.com/2011/07/notd-metallic-purple-party.html xx
ReplyDeleteI tried my hand at it too http://thenailsibite.blogspot.com/2011/08/mummy-manicure.html
ReplyDeleteused your tape to get another couple days from this mani! http://2.bp.blogspot.com/-_7hDT4CN86Q/Tmq-V7lw-PI/AAAAAAAAAYE/J-ITbA8U0Cg/s320/291217_822368599822_25112449_39342388_1735709_o.jpg
ReplyDeleteMy attempt at your mummy tutorial!
ReplyDeletehttp://i55.tinypic.com/v3g9aa.jpg
i will try this nail art hihihi thanks for the idea, i always love your designs! :D
ReplyDeleteI tried this and found that it works even better with painters tape instead of regular tape. My regular tape would rip in half and then my nails would be donezo /: just a suggestion if you have painters tape laying around :)
ReplyDelete@Anonymous: Thanks for the suggestion :) I actually tried painters tape once, but it gave me less crisp lines than cello tape, also I found it to be a bit too sturdy to lay flat on the nails. But perhaps mine's a different kind? Because it does work for a lot of other people. Thanks for leaving your tip though ^^ It might help other readers that have the same problem as you did.
ReplyDeletecool idea! i try this tomorrow!
ReplyDeletejust need a cherrish red color^^ black is always at home
So I've been wanting to try this for ages and finally did it last night! What do you think?! http://quartkneeex3.blogspot.com/2012/02/mummy-mani.html
ReplyDeletei love it! but i can`t seem to make it right, i guess it's the tape...
ReplyDeleteYou are very creative. I just started following you... I am new to the blogging world but I cannot wait to try out some of your creations. Great tutorials.
ReplyDeletejolie
ReplyDelete